
Finding where mice are entering your home is the most critical step in long-term pest management. Because mice can compress their bodies to fit through openings as small as a dime, they often exploit structural weaknesses that are invisible to the casual observer. Learning how to identify mouse entry points requires a methodical approach that prioritizes the exterior foundation, utility lines, and roofline areas where these rodents typically gain access.
This process is not about finding a single hole, but rather conducting a systematic audit of your home’s exterior envelope. By focusing on common vulnerabilities and understanding how mice navigate, you can effectively locate and seal the pathways that allow them inside. This guide provides the practical steps needed to perform a thorough inspection and secure your living space against future intrusion.
Before You Start: Preparation and Safety
Before you begin your inspection, gather the right tools to ensure you can reach high areas and illuminate dark corners. You will need a high-lumen flashlight, a telescoping mirror, a sturdy ladder, and a notepad to document findings. Proper lighting is essential; mice often leave behind smudge marks—a mixture of dirt and body oils—that are only visible when light hits them at an angle. A telescoping mirror allows you to check behind heavy appliances or under low-clearance decks without moving heavy objects.
Safety is paramount when inspecting for rodent activity. Mice can carry pathogens, so wear gloves and a dust mask if you are crawling into attics, crawlspaces, or basements. Avoid touching nesting materials or droppings directly. If you encounter a heavy infestation, such as strong odors, large amounts of droppings, or visible damage to insulation, it is often wiser to contact a professional pest control service rather than attempting to handle the exclusion yourself. Professionals have the experience to identify structural breaches that might be hidden behind siding or within complex roof junctions.
Finally, understand that your goal is exclusion, not just observation. As you identify potential entry points, do not simply block them with temporary materials like wood, plastic, or expanding foam, as mice can chew through these easily. Plan to use steel wool, hardware cloth, or copper mesh combined with construction-grade sealant. Taking the time to prepare the right materials now will save you from having to redo the work when a mouse inevitably chews through a weak patch.
Prerequisites for a Successful Inspection
To identify mouse entry points effectively, you must understand the structural anatomy of your home. Mice are climbers and jumpers; they do not just enter through the foundation. They frequently utilize tree branches, power lines, and downspouts to reach the upper stories of a house. Your inspection must be three-dimensional, covering everything from the ground level to the eaves.
Check your home’s exterior for common “bridge” points. These include overgrown vegetation touching the siding, piles of firewood stacked against the house, and debris near the foundation. These items provide cover and easy access to higher points on the structure. Before starting your search, clear a three-foot buffer zone around the entire perimeter of your home. This makes it significantly easier to see the foundation, vents, and utility penetrations that are usually hidden by landscaping.
Consider the seasonal timing of your inspection. As temperatures drop in the fall, mice seek warmth, making this the peak time for new entry attempts. However, spring inspections are equally vital to identify damage caused during the winter months. By maintaining a consistent schedule for home maintenance, you can catch new structural weaknesses before they become major pest-proofing failures.
Step-by-Step: How to Identify Mouse Entry Points
1. Examine the Foundation and Sill Plate. Start at the ground level. Look for cracks in the concrete foundation or gaps where the wooden sill plate meets the masonry. Mice frequently enter where the siding meets the foundation. Use your flashlight to inspect the entire perimeter, paying close attention to corners and areas where different building materials meet. If you notice crumbling mortar or gaps between the siding and the foundation, these are high-priority areas for sealing.
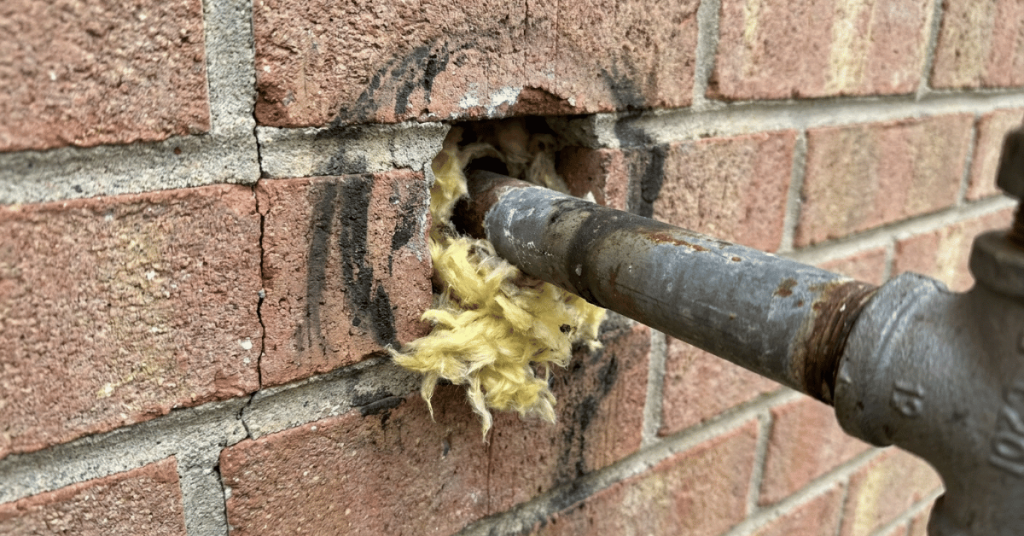
2. Inspect Utility Penetrations. Pipes and wires entering the house are prime entry points. Check the areas where HVAC lines, plumbing, and electrical conduits pass through exterior walls. Often, the hole drilled for the pipe is larger than the pipe itself, leaving a gap. If you see daylight around a pipe, a mouse can get through. Use a flashlight to illuminate the interior of these gaps. If you find them, fill them with steel wool and seal them with a durable exterior-grade caulk.
3. Check Vents and Screens. Dryer vents, attic vents, and crawlspace vents are common culprits. Ensure that all screens are intact and made of heavy-gauge metal. Plastic vent covers are easily chewed. If a screen is loose or missing, it is an immediate priority for repair. Check the integrity of the mesh; if it is rusted or has holes, replace the entire vent cover with a stainless steel alternative to ensure long-term structural integrity.
4. Evaluate the Roofline and Eaves. Use a ladder to inspect the roof-to-wall intersections. Mice can climb siding and squeeze into gaps under the shingles or where the roof meets the soffit. Look for chewed wood or gaps in the fascia boards. If you have overhanging tree branches, these are likely the bridges the mice are using to reach the roof. Trimming branches back at least six feet from the roofline is an essential part of rodent exclusion.
5. Look for Signs of Activity. During your search, look for secondary evidence. Rub marks (dark, greasy streaks) near holes, gnaw marks on wood or plastic, and droppings are clear indicators of a high-traffic entry point. If you find these, you have likely located an active path. Pay attention to the location of these signs; if you find droppings near a wall, check the exterior wall directly behind that spot for a corresponding hole.
Deep Dive: Advanced Inspection Techniques
Beyond the basics, effective pest proofing requires looking at the “hidden” architecture of your home. Many modern homes have complex rooflines with multiple valleys and dormers. These areas are notorious for having gaps where flashing is improperly installed or has pulled away over time. Inspecting these areas often requires a ladder and a high-powered flashlight to see into the dark corners where the roof meets the wall.
Another area often overlooked is the garage. Garage doors are rarely airtight. While you cannot completely seal a garage door, you can install heavy-duty rubber weather stripping along the bottom and sides. Mice often enter the garage and then move into the main living space through gaps around the door leading from the garage into the house. Inspect the threshold of this interior door carefully; if you can see light underneath it, install a door sweep to block the path.
When inspecting for structural breaches, think like a rodent. Mice are constantly looking for paths of least resistance. They prefer to travel along protected edges—such as along the base of a wall or behind dense shrubbery. If you have a deck, crawl underneath it and inspect the foundation wall behind the deck framing. This is a protected area where mice can work on a hole undisturbed by predators or homeowners.
Common Mistakes During Inspection
One of the most frequent mistakes is focusing only on the ground level. Many homeowners assume mice enter through the basement, but they are agile climbers that frequently enter through the roof or second-story siding. Another error is assuming that if you don’t see a hole, there isn’t one. Mice can enter through gaps as small as a quarter-inch, which can be hidden behind decorative trim or siding.
Another common mistake is using the wrong materials to seal gaps. Many people reach for spray foam, which is excellent for insulation but ineffective against rodents. Mice can chew through cured foam in minutes. Always use a metal barrier like steel wool or hardware cloth to block the hole before applying a sealant or patch. Finally, do not ignore the “hidden” entries like garage door seals or gaps under exterior doors. If you can slide a pencil under your door, a mouse can get through.
Avoid the temptation to seal everything with a single product. Different materials require different solutions. For instance, a gap around a pipe is best handled with steel wool and caulk, while a large hole in a wooden vent cover requires hardware cloth secured with screws. Using the wrong material often leads to a false sense of security, as the mouse will simply chew through the patch within a few days.
Troubleshooting Your Findings
If you have sealed all visible gaps but still hear scratching, you may have missed an entry point or the mice are already inside. In this case, perform a “dust test.” Sprinkle a fine layer of flour or talcum powder near suspected areas or along baseboards. If you see tracks the next morning, you have confirmed their path of travel. If you continue to find new holes, it is possible that the mice are chewing their way in through a different, less obvious location, such as a rotted window frame or a missing brick mortar joint. When in doubt, perform the inspection during the evening when the house is quiet, as you may hear the movement that directs you to the specific entry point.
Consider the possibility of “internal” entry points. Sometimes, mice enter the wall cavity from the exterior, but they move between floors through gaps around plumbing stacks or electrical wiring that runs inside the walls. If you have a mouse infestation that seems to move between the basement and the attic, check the utility chases. These are the vertical shafts that house plumbing and HVAC ducts. Sealing these gaps is more difficult but essential for stopping the movement of rodents throughout your home.
Finally, be patient. Rodent exclusion is an iterative process. You may seal one hole, only to find the mice have moved to another. This is normal. By consistently monitoring your home and addressing new signs of activity, you will eventually close off all viable entry points. If the activity persists despite your best efforts, it is time to reassess your strategy and potentially consult a professional who can use specialized tools like smoke testing to find hidden leaks in your home’s exterior envelope.
FAQ
What is the smallest gap a mouse can fit through?
A mouse can squeeze its body through any opening that is at least 1/4 to 3/8 of an inch wide. If you can fit a standard pencil into a crack or hole, a mouse can likely use that as an entry point. This is why it is so important to inspect even the smallest gaps around utility lines and foundation cracks.
How do I know if an entry point is currently being used?
Look for active signs such as fresh droppings, dark smudge marks (rub marks) caused by the oils in their fur, or gnaw marks around the edges of the hole. You can also place a small amount of flour on the floor near the area; if the mice are active, you will see their footprints in the dust.
Can mice chew through steel wool?
No, mice cannot chew through high-quality stainless steel wool. It is one of the most effective materials for blocking entry points because it is abrasive and difficult for them to gnaw through. Always ensure the steel wool is packed tightly into the gap and covered with a sealant like caulk or mortar to keep it in place.
Should I seal all entry points at once?
It is generally better to seal entry points as you find them, but be careful not to trap mice inside the home. If you suspect an active infestation, it is often recommended to set traps inside the house first to reduce the population before sealing the exterior holes. Otherwise, you risk trapping them inside where they may cause more damage.