When dealing with a rodent presence in your home or garage, learning how to catch a mouse with a bucket offers a straightforward, non-toxic, and reusable solution. This method relies on gravity and a simple tipping mechanism to capture mice without the need for traditional snap traps or chemical agents. By creating a setup that lures the animal toward a high-walled container, you can effectively manage the issue while keeping your living space free from the risks associated with poisons or spring-loaded devices.
Success with this approach depends largely on understanding rodent behavior, specifically their tendency to explore edges and their reliance on vertical surfaces for navigation. Because mice are naturally curious but cautious, the setup must be stable enough to feel safe for them to walk on, yet sensitive enough to trigger the trap the moment they reach the center. This guide will walk you through the essential components, the assembly process, and the placement strategies that turn a simple bucket into a reliable tool for your home.
Before You Start
Before you begin assembling your trap, take a moment to assess the environment. Mice are creatures of habit that typically follow consistent paths along baseboards, behind appliances, and inside cabinets. Identifying these high-traffic areas is the most important step in ensuring your efforts are successful. Look for signs of activity such as droppings, gnaw marks, or small grease smudges along walls, which indicate frequently traveled routes.
Safety is a priority when dealing with any form of pest management. Even if you are using a non-lethal or mechanical method, always wear gloves when handling the trap or any areas where rodents have been active. Mice can carry pathogens, and keeping your workspace clean is essential for your own health. Ensure that the bucket you choose is deep enough—at least 12 to 15 inches—to prevent the mouse from jumping out once it has fallen inside. A standard five-gallon bucket is the industry standard for this reason.
You will also need to consider the bait. Mice are attracted to high-calorie foods. Peanut butter is often the most effective choice because it is aromatic and requires the mouse to spend time licking it off, which increases the likelihood of the trap triggering correctly. Avoid using large chunks of food that a mouse can easily grab and run away with; instead, use sticky or spreadable substances that force the animal to linger on the ramp or the tipping mechanism.
Also Check: How to Catch a Mouse in the Wall?
Understanding Rodent Behavior and Trap Logic
To master how to catch a mouse with a bucket, one must appreciate the biology of Mus musculus. These animals are thigmotactic, meaning they prefer to keep their bodies in contact with vertical surfaces as they move. This is why placing your trap in the middle of an open floor is almost always a failure. By utilizing a ramp that leads to a bucket placed directly against a wall, you are mimicking the natural pathways they already use. The bucket essentially becomes a “dead end” in their pathing, which, when combined with a gravity-based trap mechanism, effectively removes them from circulation.
The structural integrity of your DIY mouse trap is paramount. If the ramp is flimsy or the tipping mechanism rattles, the mouse’s natural caution will trigger an avoidance response. Rodents are highly sensitive to changes in their environment; they often exhibit neophobia, or fear of new objects. This is why some successful practitioners leave the bucket in place for a few days without baiting it, allowing the mouse to integrate the object into its mental map of the territory before the trap is actually armed.
Tools and Prerequisites
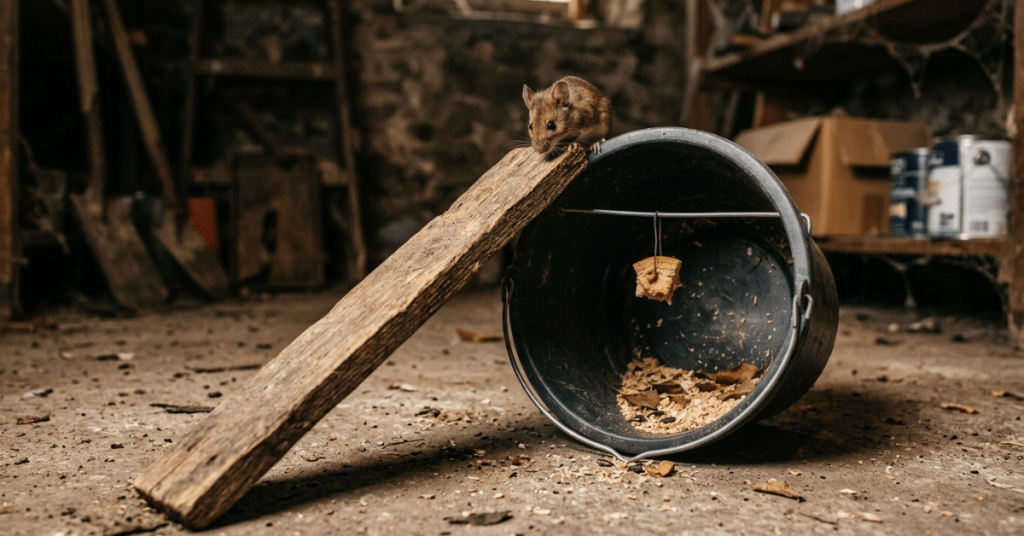
To build an effective bucket trap, you need a few basic items. Most of these are likely already in your home or easily acquired at a hardware store. The primary tool is a clean, dry five-gallon bucket. You will also need a ramp, which can be a piece of wood, a sturdy piece of cardboard, or even a stack of books leading up to the rim of the bucket. The ramp must be stable; if it wobbles, the mouse will sense danger and avoid it.
The tipping mechanism is the heart of the trap. This is typically a paint stir stick, a ruler, or a thin piece of wood balanced across the top of the bucket. You will need a way to secure the ramp to the bucket, such as duct tape or a small clamp. Finally, consider the environment inside the bucket. If you intend to catch the mouse alive, leave the bucket empty or add a small amount of bedding material. If you are using this for population control, some people choose to add a few inches of water, though this is a choice that depends entirely on your personal goals and local regulations regarding animal welfare.
Step-by-Step Instructions
1. Prepare the Bucket: Place your bucket in the identified high-traffic area. Ensure it is on a level surface so it does not tip over accidentally. If the floor is slippery, place a piece of rubber matting or a towel underneath the bucket to provide grip.
2. Create the Ramp: Position your ramp against the side of the bucket. The slope should be gradual enough that a mouse can climb it easily. Secure the top of the ramp to the rim of the bucket using duct tape. The ramp should be flush with the rim so there is no gap that might cause the mouse to stumble before it reaches the top.
3. Install the Tipping Mechanism: Balance your paint stick or ruler across the top of the bucket. It should be positioned so that one end rests on the rim and the other extends toward the center of the bucket. The stick must be perfectly balanced so that it stays in place but tips downward as soon as weight is applied to the end extending over the bucket’s opening.
4. Apply the Bait: Place a small amount of peanut butter at the very end of the tipping stick that hangs over the center of the bucket. Use only a small dab; you want the mouse to have to work for it, which ensures it walks far enough out onto the stick to trigger the fall.
5. Test the Stability: Gently tap the stick to ensure it moves freely. If it is too heavy or too light, adjust the pivot point. The goal is a delicate balance that holds the weight of the stick but gives way under the weight of a mouse.
6. Monitor and Reset: Check the trap daily. If you catch a mouse, relocate it far from your home if you are releasing it, or dispose of the contents according to local guidelines. Always reset the bait after every catch, as the scent of the previous mouse may linger and deter others.
Advanced Considerations for Pest Prevention
While the five-gallon bucket trap is a reliable component of rodent control, it is only one piece of the puzzle. True pest management requires a holistic approach that includes exclusion. Even if you catch ten mice, if you do not address the mouse entry points—such as gaps around plumbing pipes, vents, or foundation cracks—the population will simply replenish itself. Use steel wool or hardware cloth to seal these gaps, as mice cannot chew through these materials. This proactive home maintenance is the only way to ensure that your trapping efforts result in a long-term reduction of rodent activity.
Furthermore, consider the role of sanitation. Mice are attracted to food sources. Ensure that pantry items are stored in airtight glass or metal containers. Regularly sweep up crumbs and clean behind appliances where food particles often accumulate. By reducing the available food, you make your bait more attractive, as it becomes the most accessible high-calorie resource in the immediate area. This synergy between trapping and environmental modification is the hallmark of effective, non-toxic pest control.
Common Mistakes
One of the most frequent errors is using a bucket that is too shallow. If the bucket is less than 12 inches deep, an athletic mouse can often jump out. Another common mistake is failing to secure the ramp properly. If the ramp moves when the mouse steps on it, the mouse will become spooked and avoid the trap entirely. Stability is key to tricking the animal into feeling safe.
Many people also make the mistake of using too much bait. A large glob of peanut butter allows the mouse to eat its fill without walking far enough out onto the tipping mechanism. This results in the mouse eating the bait and leaving without ever triggering the trap. Additionally, placing the trap in an open area is often ineffective. Mice prefer to travel along walls and in shadows. Always place your bucket flush against a wall or in a corner where the mouse feels protected by the surrounding structure.
Troubleshooting
If you find that the bait is gone but the mouse was not caught, your tipping mechanism is likely too stable. Try adjusting the pivot point so that the stick is closer to the edge of the bucket, making it easier to tip. Alternatively, the mouse may be jumping from the ramp directly onto the rim of the bucket, bypassing the tipping stick entirely. Ensure the ramp is narrow enough that the mouse has to step onto the stick to reach the bait.
If the mouse is avoiding the trap altogether, it may be because of human scent. Mice have a keen sense of smell. Try wearing gloves while handling the trap and the bait to minimize your scent. You can also try leaving the trap in place for a few days without bait to allow the mouse to get used to the new object in its environment. Once the mouse treats the bucket as a part of its normal surroundings, add the bait to increase your success rate.
If you continue to have issues despite these adjustments, it may be time to consider whether the infestation is too large for a DIY bucket trap. If you see multiple mice during the day or find large nests, these are signs of a significant population that may require professional intervention. In such cases, a professional pest control service can provide a more comprehensive management plan that addresses the root cause of the entry points and the size of the colony.
FAQ
Is learning how to catch a mouse with a bucket effective for large infestations?
While a bucket trap is an excellent tool for catching individual mice, it is generally not sufficient for a large-scale infestation. If you are seeing mice frequently or finding evidence of a nest, the population may be too high for a single trap to manage. In these situations, it is best to use the bucket trap as a temporary measure while you seal entry points and consult with a professional to address the underlying issue.
How often should I check the bucket trap?
You should check the trap at least once every 24 hours. If you are using the bucket to catch mice alive, checking it daily is essential to prevent the animal from suffering from dehydration or stress. If the trap is left unchecked for too long, it can also become a health hazard, as the presence of a trapped rodent can attract other pests or lead to unsanitary conditions in your home.
Can I use this method to catch other types of rodents?
The bucket trap method is specifically designed for mice due to their size and weight. Larger rodents, such as rats, are often too heavy for a simple tipping stick and may be strong enough to jump out of a standard five-gallon bucket. Attempting to use this method for larger animals is usually ineffective and can result in the trap being destroyed or the animal escaping.
What is the best bait to use for a bucket trap?
Peanut butter is widely considered the most effective bait because of its strong scent and sticky texture. The scent attracts the mouse from a distance, and the stickiness forces the mouse to spend time licking it off, which keeps it on the tipping mechanism long enough to trigger the fall. Other alternatives like chocolate or hazelnut spreads can also work well for the same reasons.